0%

2024-12-01 更新

tailscale局域网串流没话说,远程朋友的电脑是真的卡。
目前换成了皎月连, 远程玩起来还行,目前签到是可以无限使用的,相当于免费。

服务端(被控)
服务端
客户端
服务端

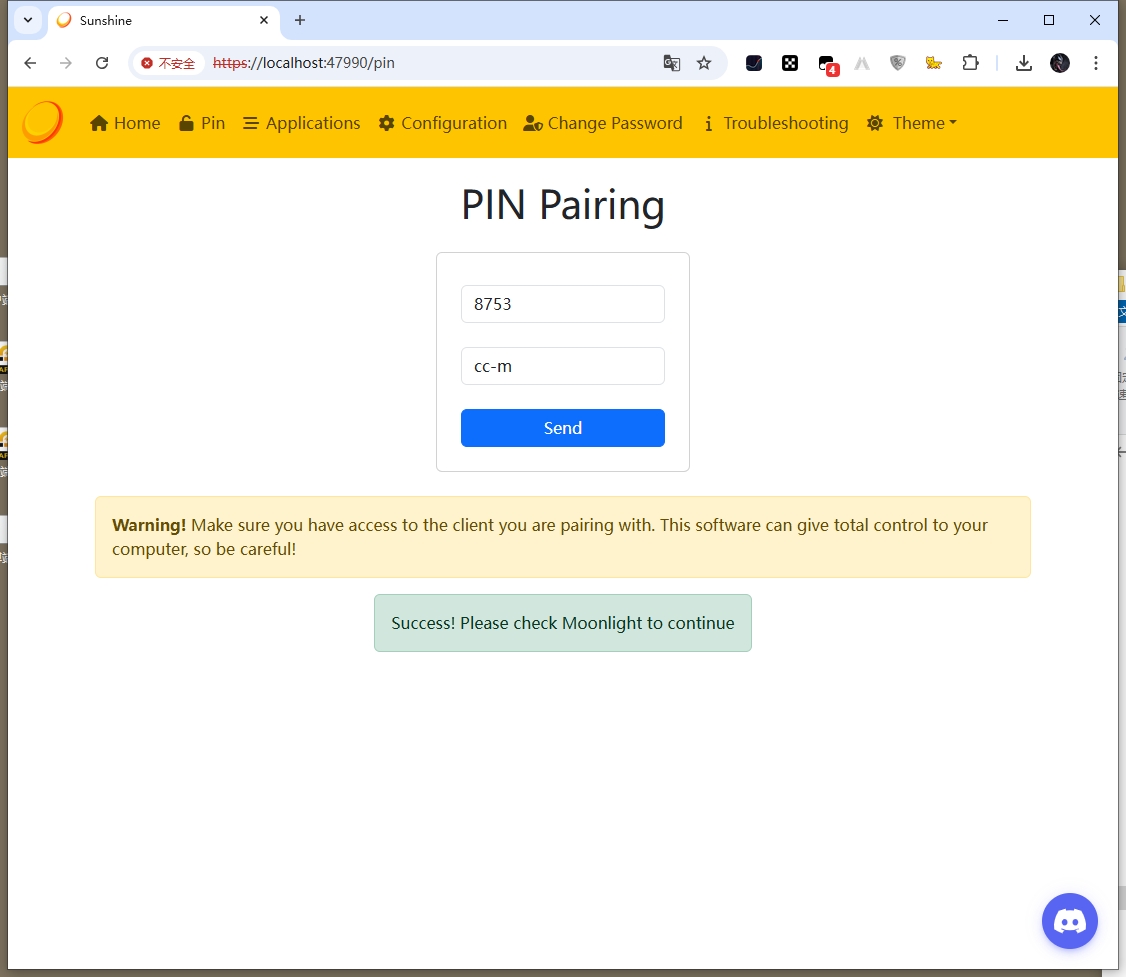
然后本机打开moonlight输入对应的ip添加设备,被控的设备输入pin码即可

前言

以前和朋友玩双人游戏都是使用parsec,但是最近parsec被墙了,有些地方没法登录,代理什么方式都试过了,所以就试试其他方式了。这里使用的是moonlight+sunshine+tailscale。演示的是手机控制电脑。
在同一个局域网下则是局域网连接,延迟更低,否则以个人网络情况为准

下载地址

pc-moonlight
手机-moonlight
下载app-root-release.apk即可

sunshine
注意sunshine是被控端需要安装的,这里是pc

tailscale
这里下载pc版和安卓版

问题

  • 需要google 账号,或者其他tailscale官网允许的其他账号
  • 安装tailscale需要开启服务列表中的iphelper服务
    直接win+s 搜索服务打开找到iphelper服务,启动即可
    tailscale安装真的很慢,一定要提前开启iphelper服务,不然失败了重新安装

开始

所需软件安装之后

  • 确认tailscale中设备是否在线
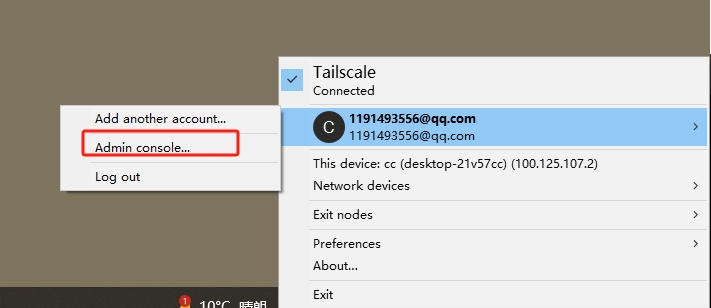
    pc和手机都安装好tailscale,并确认设备在线
    pc按照下图方式打开
    手机直接进入app登录连接即可
    open
    device

  • 打开电脑端moonlight和sunshine
    sunshine右键软件图标选择 Open sunshine即可
    打开手机端moonlight,如果没有显示设备列表,点击右上角+号输入tailscale中设备的ip即可。
    点击设备出现对应的pin码,需要在pc端输入
    input
    这里的设备名称可以随便输入的
    pin
    查看手机端,这时已经链接成功了,我们选择桌面即可
    select
    成功看到桌面了
    success

前置设置

右键windows图标进入应用和功能,打开对应的功能,需要重启
图1
图2

修改镜像储存位置

  1. 在其他盘创建一个文件夹备用,点击docker的Clean / Purge data,并退出docker
    图3

  2. 执行一下命令确定是否关闭

    1
    2
    # 查看docker-desktop和docker-desktop-data状态,需要时stop,如果时running 执行 wsl --shutdown
    wsl -l -v

    图4

  3. 执行操作

    1
    2
    3
    4
    5
    6
    7
    8
    9
    10
    11
    12
    13
    14
    15
    16
    # 这一步是将原来的docker镜像导出,命令中的“docker-desktop.tar”是相对位置,即保存在现在的DockerImages文件夹下,也可以填自己想要的绝对位置,data同理。
    wsl --export docker-desktop docker-desktop.tar

    wsl --export docker-desktop-data docker-desktop-data.tar


    # 注销docker的wsl子系统
    wsl --unregister docker-desktop

    wsl --unregister docker-desktop-data

    # 新位置重新创建,执行之后会多两个.vhdx虚拟磁盘
    wsl --import docker-desktop G:\software\docker\images\docker-desktop docker-desktop.tar

    wsl --import docker-desktop-data G:\software\docker\images\docker-desktop-data docker-desktop-data.tar

图5
4. 启动docker拉取镜像即可

环境

1
2
window10
node v14.0.0

安装必要的包

1
2
3
4
5
6
7
8
9
10
11
12
13
14
15
16
# 在powerShell中执行

# 修改执行策略,选择是 or 全是
set-executionpolicy unrestricted -s cu
# 安装scoop
iex "& {$(irm get.scoop.sh)} -RunAsAdmin"

# 安装 extras
scoop bucket add extras
# 安装 ios-webkit-debug-proxy
scoop install ios-webkit-debug-proxy


# cmd
npm install vs-libimobile -g
npm install remotedebug-ios-webkit-adapter -g

iphone 配置

  • 打开设置->safari->高级->web 查看器
  • 连接电脑(使用爱思助手或者 itunes)
  • 打开 safari 进入需要调试的网页

运行 remotedebug_ios_webkit_adapter

1
2
# cmd
remotedebug_ios_webkit_adapter --port=9001

浏览器设置

  • 访问 chrome://inspect/#devices
  • 配置地址

1
2
3

背景

1
2
3
在公司中做webar(three.js+ar.js)的时候提了一个需求希望对场景提亮,使得展示的产品看起来有点感觉,
最开始想的是使用canvas获取像素数据进行处理,但是性能会比较低,如果直接使用webgl也挺麻烦的,
而p5.js 对webgl进行了封装,可以非常简单的上手

所用技术

1
webrtc + p5.js

在线预览

所有代码

1
2
3
4
5
6
7
8
9
10
11
12
13
14
15
16
17
18
19
20
21
22
23
24
25
26
27
28
29
30
31
32
33
34
35
36
37
38
39
40
41
42
43
44
45
46
47
48
49
50
51
52
53
54
55
56
57
58
59
60
61
62
63
64
65
66
67
68
69
70
71
72
73
74
75
76
77
78
79
80
81
82
83
84
85
86
87
88
89
90
91
92
93
94
95
96
97
98
99
100
101
102
103
104
105
106
107
108
109
110
111
112
113
114
115
116
117
118
119
120
121
122
123
124
125
126
127
128
129
130
131
132
133
134
135
136
137
138
139
140
141
142
143
144
145
146
147
148
149
150
151
152
153
154
155
156
157
158
159
160
161
162
163
164
165
166
167
168
169
170
171
172
173
174
175
176
177
178
179
180
181
182
183
184
185
186
187
188
189
190
191
192
193
194
195
196
197
198
199
200
201
202
203
204
205
206
207
208
209
210
211
212
213
<!DOCTYPE html>
<html lang="en">
<head>
<meta charset="UTF-8" />
<meta name="viewport" content="width=device-width, initial-scale=1.0" />
<title>视频滤镜</title>
<link rel="stylesheet" href="./css/element.css" />
<style>
* {
margin: 0;
padding: 0;
box-sizing: border-box;
}
video {
display: none;
opacity: 0;
}
</style>
</head>
<body>
<div id="app">
<el-select @change="setFilter" v-model="curFilter" placeholder="请选择">
<el-option
v-for="item in filters"
:key="item.value"
:label="item.label"
:value="item.value"
>
</el-option>
</el-select>
<video ref="myVideo" autoplay playsinline muted></video>
</div>
<script src="./js//qrcode.js"></script>
<script src="./js//vue.js"></script>
<script src="./js//element.js"></script>
<script src="./js/5.3.3/pixi.min.js"></script>
<script>
// filters
const filters = {
def: null,
// 灰度
grey: {
fragmentShader: `
precision mediump float;
varying vec2 vTextureCoord;
uniform sampler2D uSampler;
const vec3 W = vec3(0.2125, 0.7154, 0.0721);
void main(void) {
vec4 color = texture2D(uSampler, vTextureCoord);
float temp = dot(color.rgb, W);
gl_FragColor = vec4(vec3(temp), 1.0);
}
`,
},
// 高斯模糊
blur: {
fragmentShader: `
precision mediump float;
varying vec2 vTextureCoord;
uniform sampler2D uSampler;
uniform vec2 uResolution; // 纹理分辨率
uniform float uBlurRadius; // 模糊半径

// 高斯函数
float gaussian(float x, float sigma) {
return exp(-(x * x) / (2.0 * sigma * sigma)) / (2.0 * 3.14159 * sigma * sigma);
}

void main(void) {
// 在此处添加自定义的着色器逻辑
vec2 texelSize = 1.0 / uResolution;
float sigma = uBlurRadius; // 高斯函数的标准差

vec4 colorSum = vec4(0.0);
float weightSum = 0.0;

// 对周围像素进行采样和加权平均
for (int i = -5; i <= 5; i++) {
for (int j = -5; j <= 5; j++) {
vec2 offset = vec2(float(i), float(j)) * texelSize;
vec4 sampleColor = texture2D(uSampler, vTextureCoord + offset);

float weight = gaussian(float(i), sigma) * gaussian(float(j), sigma);
colorSum += sampleColor * weight;
weightSum += weight;
}
}

// 归一化颜色和权重
vec4 blurredColor = colorSum / weightSum;

gl_FragColor = blurredColor;
}
`,
uniforms: {
uResolution: [800, 600],
uBlurRadius: 10,
},
},
// 场景提亮
brighten: {
fragmentShader: `
precision mediump float;
varying vec2 vTextureCoord;
uniform sampler2D uSampler;
uniform float strength;
void main(void) {
// 在此处添加自定义的着色器逻辑
vec4 color = texture2D(uSampler, vTextureCoord);
color.rgb += strength;
gl_FragColor = color;
}
`,
uniforms: {
strength: 0.1,
},
},
// 反色
inverseColor: {
fragmentShader: `
precision mediump float;
varying vec2 vTextureCoord;
uniform sampler2D uSampler;
void main(void) {
// 在此处添加自定义的着色器逻辑
vec4 color = texture2D(uSampler, vTextureCoord);
gl_FragColor = vec4(1.-color.rgb,1.);
}
`,
},
};

// webrtc option
const constraints = {
video: {
facingMode: {
ideal: "environment",
},
},
audio: false,
};

const vue = new Vue({
el: "#app",
data: function () {
this.filters = Object.keys(filters).map((it) => {
return {
label: it,
value: it,
};
});
return {
curFilter: "",
};
},
mounted() {
window.ins = this;
this.init();
},
computed: {
videoEl() {
return this.$refs["myVideo"];
},
},
methods: {
setFilter(key) {
// 修改不同的滤镜 或者结合不同的滤镜
if (!filters[key]) {
this.curFilter = "def";
this.videoSprite.filters = [];
return;
}
this.curFilter = key;
const filter = filters[key];
const shader = new PIXI.Filter(
null,
filter.fragmentShader,
filter.uniforms || {}
);
this.videoSprite.filters = [shader];
},
async init() {
// webrtc 从摄像机获取视频流
const localStream = await navigator.mediaDevices
.getUserMedia(constraints)
.catch((err) => console.log(err));
// 本地视频流
this.videoEl.srcObject = localStream;

// 初始化 p5.js
this.app = new PIXI.Application({
// width,height
});
// 将渲染器添加到页面中的一个元素
this.$el.appendChild(this.app.view);
// 创建 video 贴图
const videoTexture = PIXI.Texture.fromVideo(this.videoEl);
const videoSprite = new PIXI.Sprite(videoTexture);
this.videoSprite = videoSprite;
videoSprite.x = 0;
videoSprite.y = 0;
videoSprite.width = this.app.screen.width;
videoSprite.height = this.app.screen.height;
this.setFilter("inverseColor");

// 将视频精灵添加到舞台
this.app.stage.addChild(videoSprite);
},
},
});
</script>
</body>
</html>

背景

1
在AI stable Diffusion 中图片替换、局部重绘需要提供一张蒙版图,每次在ps中修改太麻烦了

基本实现流程

1
2
3
4
准备一个canvas作为涂抹层(在视图层上)
准备一个div作为展示原图层
准备一个div作为鼠标指针
原理是不断画圆形连接成曲线

在线预览

所有代码

1
2
3
4
5
6
7
8
9
10
11
12
13
14
15
16
17
18
19
20
21
22
23
24
25
26
27
28
29
30
31
32
33
34
35
36
37
38
39
40
41
42
43
44
45
46
47
48
49
50
51
52
53
54
55
56
57
58
59
60
61
62
63
64
65
66
67
68
69
70
71
72
73
74
75
76
77
78
79
80
81
82
83
84
85
86
87
88
89
90
91
92
93
94
95
96
97
98
99
100
101
102
103
104
105
106
107
108
109
110
111
112
113
114
115
116
117
118
119
120
121
122
123
124
125
126
127
128
129
130
131
132
133
134
135
136
137
138
139
140
141
142
143
144
145
146
147
148
149
150
151
152
153
154
155
156
157
158
159
160
161
162
163
164
165
166
167
168
169
170
171
172
173
174
175
176
177
178
179
180
181
182
183
184
185
186
187
188
189
190
191
192
193
194
195
196
197
198
199
200
201
202
203
204
205
206
207
208
209
210
211
212
213
214
215
216
217
218
219
220
221
222
223
224
225
226
227
228
229
230
231
232
233
234
235
236
237
238
239
240
241
242
243
244
245
246
247
248
249
250
251
252
253
254
255
256
257
258
259
260
261
262
263
264
265
266
267
268
269
270
271
272
273
274
275
276
277
278
279
280
281
282
283
284
285
286
287
288
289
290
291
292
293
294
295
296
297
298
299
300
301
302
303
304
305
306
307
308
309
310
311
312
313
314
315
316
317
318
319
320
321
322
323
324
325
326
327
328
329
330
331
332
333
334
335
336
337
338
339
340
341
342
343
344
345
346
347
348
349
350
351
352
353
354
355
356
357
358
359
360
361
362
363
364
365
366
367
368
369
370
371
372
373
374
375
376
377
378
379
380
381
382
383
384
385
386
387
388
389
390
391
392
393
394
395
396
397
398
399
400
401
402
403
404
405
406
407
408
409
410
411
412
413
414
415
416
417
418
419
420
421
422
423
424
425
426
427
428
429
430
431
432
433
434
<!-- 需要自行导入相关js、css -->
<!DOCTYPE html>
<html lang="en">
<head>
<meta charset="UTF-8" />
<meta http-equiv="X-UA-Compatible" content="IE=edge" />
<meta name="viewport" content="width=device-width, initial-scale=1.0" />
<title>canvas 涂抹生成蒙版图</title>
<link rel="stylesheet" href="./css/element.css" />
<style>
.canvas-container {
position: relative;
}
#mycanvas {
position: absolute;
left: 0;
top: 0;
background: transparent;
}
#mycanvas.active {
cursor: none;
}
#cursor {
position: absolute;
pointer-events: none;
left: 0;
top: 0;
aspect-ratio: 1 / 1;
border-radius: 50%;
background: rgba(white, 0.4);
box-sizing: border-box;
border: 2px solid white;
}
.view {
display: flex;
align-items: center;
justify-content: center;
}
.view img {
object-fit: contain;
max-width: 100%;
max-height: 100%;
}
</style>
</head>

<body>
<div id="app">
<input type="file" @change="fileChange" accept="image/*" />
<div class="canvas-container">
<!-- 绘画层 -->
<canvas
id="mycanvas"
:class="pointerPos.active ? 'active' : ''"
ref="mycanvas"
:width="width"
:height="height"
:style="{
width: width + 'px',
height: height + 'px'
}"
></canvas>
<div
id="cursor"
v-if="pointerPos.active"
:style="{
width: drawConfig.radius * 2 + 'px',
height: drawConfig.radius * 2 + 'px',
transform: `translate3d(${pointerPos.x - drawConfig.radius}px,${
pointerPos.y - drawConfig.radius
}px,0)`
}"
></div>

<div
class="view"
:style="{
width: width + 'px',
height: height + 'px',
backgroundColor:backgroundColor

}"
>
<img
ref="view-img"
:style="aspect<=1 ? 'height:100%' : 'width:100%'"
v-if="img"
:src="img"
alt=""
/>
</div>
</div>
<el-slider
style="width: 200px"
:min="10"
:max="20"
v-model="drawConfig.radius"
></el-slider>
<div @click="revoke">撤销</div>
<div @click="reset">重置</div>
<div @click="confirm">确定</div>
<div @click="cancel">取消</div>
橡皮擦<el-switch
v-model="isClear"
active-color="#13ce66"
inactive-color="#ff4949"
>
</el-switch>
</div>

<script src="./js//qrcode.js"></script>
<script src="./js//vue.js"></script>
<script src="./js//element.js"></script>
<script>
// tools
async function getBase64(file) {
//把图片转成base64编码
return new Promise(function (resolve, reject) {
let reader = new FileReader();
let imgResult = "";
reader.readAsDataURL(file);
reader.onload = function () {
imgResult = reader.result;
};
reader.onerror = function (error) {
reject(error);
};
reader.onloadend = function () {
resolve(imgResult);
};
});
}

async function newImage(url) {
return new Promise((resolve, reject) => {
const img = new Image();
img.setAttribute("crossOrigin", "anonymous");
img.onload = () => {
resolve(img);
};
img.src = url;
});
}

function getPoints(p1, p2, num = 10) {
const [x, y] = p1;
const [x1, y1] = p2;
const points = [];
if (num < 2) {
return [p2];
}
for (let index = 0; index < num - 1; index++) {
points.push([
x + ((x1 - x) / num) * index,
y + ((y1 - y) / num) * index,
]);
}
points.push(p2);
return points;
}

function dataURLtoBlob(dataurl) {
// base64 to blob
var arr = dataurl.split(","),
mime = arr[0].match(/:(.*?);/)[1],
bstr = atob(arr[1]),
n = bstr.length,
u8arr = new Uint8Array(n);
while (n--) {
u8arr[n] = bstr.charCodeAt(n);
}
return new Blob([u8arr], { type: mime });
}

new Vue({
el: "#app",
data: function () {
this.pathes = []; //存储所有路径的 方便撤销等操作
this.currPath = {}; //当前存储的路径
return {
img: null, // 源图片
width: 800,
height: 500,
aspect: 0, //图片宽高比
backgroundColor: "#000000",
isDrawing: false,
isClear: false,
drawConfig: {
radius: 20,
color: "white",
},
pointerPos: {
x: -1000,
y: -1000,
active: false,
},
};
},
mounted() {
window.ins = this;
},
beforeDestroy() {
this.removeEvent();
},
computed: {
canvasDraw() {
return this.$refs["mycanvas"];
},
ctxDraw() {
return this.canvasDraw.getContext("2d");
},
},
methods: {
async fileChange(e) {
var file = event.target.files[0];
if (!file) return;
const base64 = await getBase64(file);
let img = await newImage(base64);
this.imgOrignSize = {
width: img.width,
height: img.height,
};
this.aspect = img.width / img.height;
this.img = base64;
this.init();
},
init() {
this.initEvent();
},
initEvent() {
this.removeEvent();
this.canvasDraw.addEventListener("mousedown", this.mouseDown, true);
this.canvasDraw.addEventListener("mousemove", this.mouseMove, true);
window.addEventListener("mouseup", this.mouseUp, false);
this.canvasDraw.addEventListener(
"mouseover",
this.mouseOver,
false
);
this.canvasDraw.addEventListener("mouseout", this.mouseOut, false);
},
removeEvent() {
this.canvasDraw.removeEventListener(
"mousedown",
this.mouseDown,
false
);
this.canvasDraw.removeEventListener(
"mousemove",
this.mouseMove,
false
);
window.removeEventListener("mouseup", this.mouseUp, false);
this.canvasDraw.removeEventListener(
"mouseover",
this.mouseOver,
false
);
this.canvasDraw.removeEventListener(
"mouseout",
this.mouseOut,
false
);
},
mouseOver(e) {
this.pointerPos.active = true;
},
mouseOut(e) {
this.pointerPos.active = false;
},
mouseDown(e) {
const { offsetX, offsetY } = e;
const temp = {
radius: this.drawConfig.radius,
color: this.drawConfig.color,
pos: [offsetX, offsetY],
clear: this.isClear,
};
this.currPath = {
radius: this.drawConfig.radius,
color: this.drawConfig.color,
clear: this.isClear,
points: [],
};
this.currPath.points.push([offsetX, offsetY]);
this.drawCircle({
radius: this.currPath.radius,
color: this.currPath.color,
clear: this.currPath.clear,
pos: [offsetX, offsetY],
});
this.isDrawing = true;
},
mouseMove(e) {
const { offsetX, offsetY } = e;
this.pointerPos.x = offsetX;
this.pointerPos.y = offsetY;
this.pointerPos.active = true;
if (!this.isDrawing) return;
const prePos =
this.currPath.points[this.currPath.points.length - 1];
let maxDistance = Math.max(
Math.abs(prePos[0] - offsetX),
Math.abs(prePos[1] - offsetY)
);
const points = getPoints(
prePos,
[offsetX, offsetY],
Math.floor(maxDistance / 2)
);
this.currPath.points.push(...points);

points.forEach((point) => {
this.drawCircle({
radius: this.currPath.radius,
color: this.currPath.color,
clear: this.currPath.clear,
pos: point,
});
});
},
mouseUp(e) {
if (!this.isDrawing) return;
this.isDrawing = false;
this.pathes.push(this.currPath);
this.currPath = {};
},
drawCircle(posItem, ctx = this.ctxDraw) {
const { pos, color, radius, clear } = posItem;
ctx.beginPath();
ctx.fillStyle = color;
ctx.arc(pos[0], pos[1], radius, 0, 2 * Math.PI);
if (clear) {
let width = ctx.userData?.width || this.width;
let height = ctx.userData?.height || this.height;
ctx.save();
ctx.clip();
ctx.clearRect(0, 0, width, height);
ctx.restore();
} else {
ctx.fill();
}
},
revoke() {
if (!this.pathes.length) {
return;
}
this.pathes.pop();
this.drawPath();
},
reset() {
this.drawConfig = {
radius: 20,
color: "white",
};
this.isClear = false;

this.pathes = [];
this.ctxDraw.clearRect(0, 0, this.width, this.height);
},
getCurImgConfig() {
const img = this.$refs["view-img"];
return {
width: img.width,
height: img.height,
x: img.offsetLeft,
y: img.offsetTop,
};
},
async confirm() {
const {
ctxView: ctx,
imgOrignSize: { width, height },
backgroundColor,
} = this;
const { x, y, width: w, height: h } = this.getCurImgConfig();
const canvas_ = document.createElement("canvas");
canvas_.style.width = width;
canvas_.style.height = height;
canvas_.width = width;
canvas_.height = height;
const ctx_ = canvas_.getContext("2d");
const scale = {
wScale: width / w,
hScale: height / h,
};
if (!this.img) return;
ctx_.userData = {
width,
height,
};
this.drawPath(ctx_, false, scale);
const pathImg = await newImage(canvas_.toDataURL());

ctx_.fillStyle = backgroundColor;
ctx_.fillRect(0, 0, width, height);
// 是否携带原始背景图
// ctx_.drawImage(this.$refs["view-img"], 0, 0, width, height);
ctx_.drawImage(pathImg, 0, 0, width, height);
const url = URL.createObjectURL(dataURLtoBlob(canvas_.toDataURL()));
window.open(url);
},
cancel() {},
drawPath(ctx = this.ctxDraw, clear = true, scale) {
const { x, y } = this.getCurImgConfig();
if (clear) {
ctx.clearRect(0, 0, this.width, this.height);
}
for (const path of this.pathes) {
for (const pos of path.points) {
let tempPos = [...pos];
let tempRadius = path.radius;
if (scale) {
tempPos[0] = (tempPos[0] - x) * scale.wScale;
tempPos[1] = (tempPos[1] - y) * scale.hScale;
tempRadius *= Math.max(scale.wScale, scale.hScale);
}
this.drawCircle(
{
radius: tempRadius,
color: path.color,
clear: path.clear,
pos: tempPos,
},
ctx
);
}
}
},
},
});
</script>
</body>
</html>

实现代码

1
2
3
4
5
6
7
8
9
10
11
12
13
14
15
16
17
18
19
20
21
22
23
24
25
26
27
28
29
30
31
class Task {
constructor(count) {
this.maxCount = count;
this.runCount = 0;
this.tasks = [];
}

add(task) {
return new Promise((resolve, reject) => {
this.tasks.push({
task,
resolve,
reject,
});
this.run();
});
}

run() {
while (this.tasks.length && this.runCount < this.maxCount) {
const { task, resolve, reject } = this.tasks.shift();
this.runCount++;
task()
.then(resolve, reject)
.finally(() => {
this.runCount--;
this.run();
});
}
}
}

demo

1
2
3
4
5
6
7
8
9
10
11
12
13
14
const task = new Task(2);
function demo(time, index) {
return new Promise((resolve) => {
setTimeout(() => {
resolve(index);
console.log(index);
}, time);
});
}
// 最多同时执行两个任务 所以这里先打印1,2然后打印3,4
task.add(() => demo(1000, 1));
task.add(() => demo(1000, 2));
task.add(() => demo(1000, 3));
task.add(() => demo(1000, 4));

vuex 数据持久化

所需的 npm 包

1
2
"secure-ls": "^1.2.6", // 用于加密
"vuex-persistedstate": "^4.1.0" // 用于vuex数据持久化

store

1
2
3
4
5
6
7
8
9
10
11
12
13
14
15
16
17
18
19
20
21
22
23
24
25
26
27
28
29
30
31
32
33
34
35
36
37
38
import Vue from "vue";
import Vuex from "vuex";
import SecureLS from "secure-ls";
import persistedState from "vuex-persistedstate";

const files = require.context("./modules", false, /\.js$/);
let modules = {};
files.keys().forEach((key) => {
let name = path.basename(key, ".js");
modules[name] = files(key).default || files(key);
});

const ls = new SecureLS({
encodingType: "aes", //加密类型
isCompression: false, //是否压缩
encryptionSecret: "encryption", //PBKDF2值 加密秘密
});

export default new Vuex.Store({
state: {},
mutations: {},
actions: {},
getters: {},
modules,
plugins: [
persistedState({
key: "inpackStore",
// 需要持久化的modules,不填默认全部
paths: ["test"],
// 具体内容参考官网 localStorage、cookie等持久化方式
storage: {
getItem: (key) => ls.get(key),
setItem: (key, value) => ls.set(key, value),
removeItem: (key) => ls.remove(key),
},
}),
],
});

query 加密

当我们通过 url 传参时,可以进行简单的加密

router.js

1
2
3
4
5
6
7
8
9
10
11
12
13
14
15
16
17
18
19
20
21
22
23
import Vue from "vue";
import VueRouter from "vue-router";
import { stringifyQuery, parseQuery } from "@/tools/query";

import Home from "@/views/Home.vue";

const routes = [
{
path: "/",
redirect: "/index",
name: "Home",
component: Home,
},
];

const router = new VueRouter({
mode: "hash", // history
stringifyQuery: stringifyQuery, // 序列化query参数
base: process.env.BASE_URL,
routes,
});

export default router;

query.js

1
2
3
4
5
6
7
8
9
10
11
12
13
14
15
16
17
18
19
20
21
22
23
24
25
26
27
28
29
30
31
32
33
34
35
36
37
38
39
40
41
42
43
44
45
46
47
48
49
50
51
52
53
54
55
56
57
58
59
60
61
62
63
64
65
66
67
68
69
70
71
72
73
74
75
76
77
78
79
80
81
82
83
84
85
86
87
88
89
90
91
92
93
94
95
96
97
98
99
import base64 from "./base64";
const { encode: encrypt, decode: decrypt } = base64;

const encodeReserveRE = /[!'()*]/g;
const encodeReserveReplacer = (c) => "%" + c.charCodeAt(0).toString(16);
const commaRE = /%2C/g;

const encode = (str) =>
encodeURIComponent(str)
.replace(encodeReserveRE, encodeReserveReplacer)
.replace(commaRE, ",");

const decode = decodeURIComponent;

/**
* 判断字符串是否是base64
* @param { string } str
* @returns { boolean }
*/
function isBase64(str) {
if (str === "" || str.trim() === "") {
return false;
}
try {
return btoa(atob(str)) == str;
} catch (err) {
return false;
}
}

/**
* 序列化对象 并加密
* @param {Object} obj
*/
export const stringifyQuery = (obj) => {
const res = obj
? Object.keys(obj)
.map((key) => {
const val = obj[key];

if (val === undefined) {
return "";
}

if (val === null) {
return encode(key);
}

if (Array.isArray(val)) {
const result = [];
val.forEach((val2) => {
if (val2 === undefined) {
return;
}
if (val2 === null) {
result.push(encode(key));
} else {
result.push(encode(key) + "=" + encode(val2));
}
});
return result.join("&");
}

return encode(key) + "=" + encode(val);
})
.filter((x) => x.length > 0)
.join("&")
: null;

return res ? `?${encrypt(res)}` : "";
};

/**
* 解密 反序列化字符串参数
* @param {String}} query
*/
export const parseQuery = (query) => {
const res = {};
query = query.trim().replace(/^(\?|#|&)/, "");
if (!query) {
return res;
}
// 解密
query = isBase64(query) ? decrypt(query) : query;
query.split("&").forEach((param) => {
const parts = param.replace(/\+/g, " ").split("=");
const key = decode(parts.shift());
const val = parts.length > 0 ? decode(parts.join("=")) : null;

if (res[key] === undefined) {
res[key] = val;
} else if (Array.isArray(res[key])) {
res[key].push(val);
} else {
res[key] = [res[key], val];
}
});
return res;
};

base64.js

1
2
3
4
5
6
7
8
9
10
11
12
13
14
15
16
17
18
19
20
21
22
23
24
25
26
const Base64 = {
//加密
encode(str) {
return btoa(
encodeURIComponent(str).replace(
/%([0-9A-F]{2})/g,
function toSolidBytes(match, p1) {
return String.fromCharCode("0x" + p1);
}
)
);
},
//解密
decode(str) {
// Going backwards: from bytestream, to percent-encoding, to original string.
return decodeURIComponent(
atob(str)
.split("")
.map(function (c) {
return "%" + ("00" + c.charCodeAt(0).toString(16)).slice(-2);
})
.join("")
);
},
};
export default Base64;

prod 环境去除 console.log

1
2
3
4
5
6
7
8
9
10
11
12
13
14
15
16
17
18
19
20
// "babel-plugin-transform-remove-console": "^6.9.4",

// babel.config.js
// 适用于生产环境的babel插件
const prodPlugin = [];

if (process.env.NODE_ENV !== "development") {
// 如果是生产环境,则自动清理掉打印的日志,但保留error 与 warn
prodPlugin.push([
"transform-remove-console",
{
exclude: ["error", "warn"],
},
]);
}

module.exports = {
presets: ["@vue/app"],
plugins: [...prodPlugin],
};

介绍

内网穿透网上一搜就知道是什么,但是它能做些什么,我们来说一下。比如远程桌面串流玩游戏,沙箱支付本地测试,不需要上传到服务器的本地网页demo展示等等,frp这个工具就可以实现后者

开始

参考在线文档
首先在release下载客户端(frp_0.46.0_windows_amd64.zip)和服务端(frp_0.46.0_linux_amd64)

配置

  1. 服务端配置
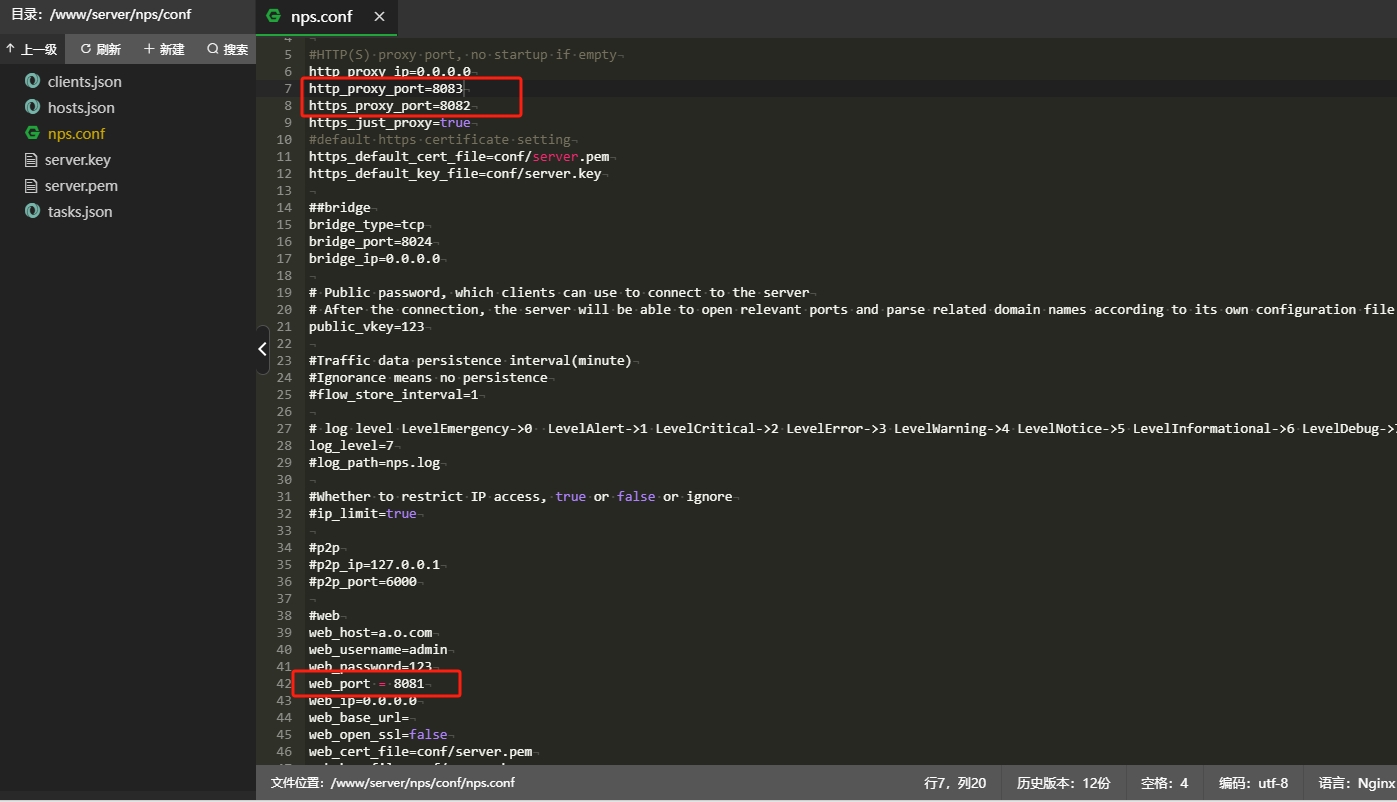
    我们只需要对frps.ini这个文件配置开启http穿透即可
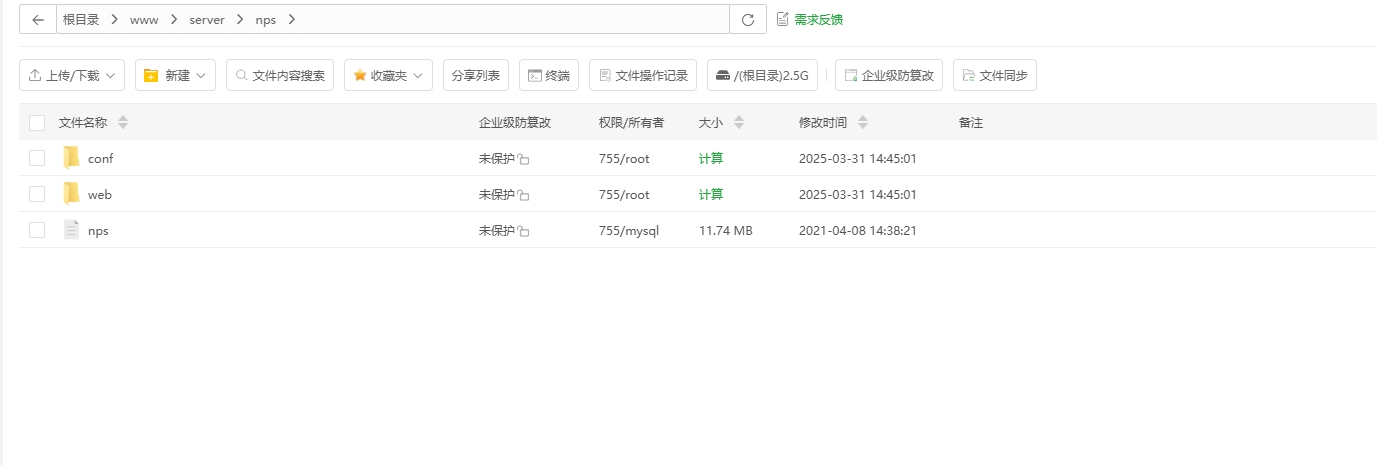
    文件列表
    文本
    然后使用./frps -c ./frps.ini来启动服务,当然你需要后台启动可以使用pm2、supervisor、nohub等来实现
    pm2 start "./frps -c ./frps.ini" --name FrpServer

  2. 客户端配置
    我们只需要配置frpc.ini文件即可
    文件列表

    1
    2
    3
    4
    5
    6
    7
    8
    9
    10
    11
    12
    13
    14
    15
    16
    17
    [common]
    server_addr = 45.32.85.241 //服务器地址
    server_port = 7000 //默认端口

    [ssh]
    type = tcp
    local_ip = 127.0.0.1
    local_port = 22
    remote_port = 6000

    [web]
    type = http
    local_ip = 127.0.0.1
    local_port = 4000 //本地web服务端口
    remote_port = 7001 //服务端配置的http穿透端口
    custom_domains = frp.coincoc.top //域名
    # custom_domains = 45.32.85.241

测试

本地起一个web服务,我这里用的就是我现在的博客
server
打开一个cmd命令窗口将frpc.exe拖入或者创建一个bat文件双击打开即可内容如下

1
2
@echo
frpc.exe

打开配置的域名访问即可,这样本地修改的内容线上还会更新,对于支付测试以及我上一个文章webrtc等需要开启https穿透才可以进行。
test

介绍

面向网络的实时通信,可以实现视频语音聊天室等。参考文档

开始

实现一个简单的视频聊天页面。
需要简单了解一下信令和 ice,可自行百度。

这里使用 socket.io 实现简单的信令

1
2
3
4
5
6
7
8
9
10
11
12
13
14
15
16
17
18
19
20
21
22
23
24
25
26
27
28
29
const express = require("express");
const path = require("path");
const app = express();
var http = require("http").Server(app);
var io = require("socket.io")(http);
app.use(express.static(path.join(__dirname, "/public")));
const port = 3000;
// 所有的房间
const rooms = {};
io.on("connection", function (socket) {
console.log("a user connected");
// 加入房间 一个房间只能加入两个客户端,需要一对多等可以自行百度
socket.on("join", (roomID) => {
if (!rooms[roomID]) {
rooms[roomID] = [];
}
rooms[roomID].push(socket);
});
// 用户交换offer和answer
socket.on("message", (e) => {
let data = e
rooms[data.id].forEach((item) => {
item.emit("message", data);
});
});
});
http.listen(port, function () {
console.log("listening on http://localhost:3000");
});

发送端

1
2
3
4
5
6
7
8
9
10
11
12
13
14
15
16
17
18
19
20
21
22
23
24
25
26
27
28
29
30
31
32
33
34
35
36
37
38
39
40
41
42
43
44
45
46
47
48
49
50
51
52
53
54
55
56
57
58
59
60
61
62
63
64
65
66
67
68
69
70
71
72
73
74
75
76
77
78
79
80
81
82
<!DOCTYPE html>
<html lang="en">

<head>
<meta charset="UTF-8">
<meta http-equiv="X-UA-Compatible" content="IE=edge">
<meta name="viewport" content="width=device-width, initial-scale=1.0">
<title>send</title>
</head>
<style>
.video {
width: 100%;
height: 300px;
}
</style>
<body>
me
<video class="video video1" autoplay playsinline controls="false"></video>
remote
<video class="video video2" autoplay playsinline controls="false"></video>
<!-- 解决浏览器兼容 -->
<script src="https://webrtc.github.io/adapter/adapter-latest.js"></script>
<script src="https://cdn.bootcdn.net/ajax/libs/qs/6.11.0/qs.min.js"></script>
<script src="http://localhost:3000/socket.io/socket.io.js"></script>
<script>
window.onload = created
let localStream, id, socket
async function created() {
// url参数传入房间号
let params = Qs.parse(location.href.split('?')[1])
id = params.id || 123
const constraints = {
video: true,
audio: true
};
localStream = await navigator.mediaDevices
.getUserMedia(constraints)
.catch(err => console.log(err));
let video = document.querySelector(".video1");
// 本地视频流
video.srcObject = localStream;
socket = io();
// 加入房间
socket.emit('join', id)
makeCall(localStream)
}
async function makeCall(stream, value) {
// 可以自己搭建iceServer
const configuration = { 'iceServers': [{ 'urls': 'stun:stun.l.google.com:19302' }] }
const peerConnection = new RTCPeerConnection(configuration);
stream.getTracks().forEach(track => {
peerConnection.addTrack(track, stream);
});
peerConnection.addEventListener('track', async (event) => {
const [remoteStream] = event.streams;
// 远端媒体流
document.querySelector('.video2').srcObject = remoteStream
});
socket.on('message', async (data) => {
if (data.answer) {
const remoteDesc = new RTCSessionDescription(data.answer);
await peerConnection.setRemoteDescription(remoteDesc);
}
})
const offer = await peerConnection.createOffer();
await peerConnection.setLocalDescription(offer).catch(err => console.log(err, 'send-setLocalDescription'));
socket.emit('message', { 'offer': offer, id })
peerConnection.addEventListener('icecandidate', event => {
if (event.candidate) {
socket.emit('message', { 'iceCandidate': event.candidate, id })
}
});
peerConnection.addEventListener('connectionstatechange', event => {
if (peerConnection.connectionState === 'connected') {
console.log('conn')
}
});
}

</script>
</body>
</html>

接收端

1
2
3
4
5
6
7
8
9
10
11
12
13
14
15
16
17
18
19
20
21
22
23
24
25
26
27
28
29
30
31
32
33
34
35
36
37
38
39
40
41
42
43
44
45
46
47
48
49
50
51
52
53
54
55
56
57
58
59
60
61
62
63
64
65
66
67
68
69
<!DOCTYPE html>
<html lang="en">

<head>
<meta charset="UTF-8">
<meta http-equiv="X-UA-Compatible" content="IE=edge">
<meta name="viewport" content="width=device-width, initial-scale=1.0">
<title>accept</title>
</head>
<style>
.video {
width: 100%;
height: 300px;
}
</style>

<body>
me
<video class="video video1" autoplay playsinline controls="false"></video>
remote
<video class="video video2" autoplay playsinline controls="false"></video>
<script src="https://webrtc.github.io/adapter/adapter-latest.js"></script>
<script src="https://cdn.bootcdn.net/ajax/libs/vConsole/3.14.7/vconsole.min.js"></script>
<script src="https://cdn.bootcdn.net/ajax/libs/qs/6.11.0/qs.min.js"></script>
<script src="http://localhost:3000/socket.io/socket.io.js"></script>
<script>
var vConsole = new VConsole();
window.onload = created
let ws, id, socket
async function created() {
let params = Qs.parse(location.href.split('?')[1])
id = params.id || 123
socket = io();
socket.emit('join', id)
const constraints = {
video: true,
audio: true
};
let stream = await navigator.mediaDevices
.getUserMedia(constraints)
.catch(err => console.log(err));
let video = document.querySelector(".video1");
video.srcObject = stream;
const configuration = { 'iceServers': [{ 'urls': 'stun:stun.l.google.com:19302' }] }
const peerConnection = new RTCPeerConnection(configuration);
stream.getTracks().forEach(track => {
peerConnection.addTrack(track, stream);
});
peerConnection.addEventListener('track', async (event) => {
const [remoteStream] = event.streams;
document.querySelector('.video2').srcObject = remoteStream
});
socket.on('message', async (data) => {
if (data.offer) {
console.log('offer', data.offer)
peerConnection.setRemoteDescription(new RTCSessionDescription(data.offer));
const answer = await peerConnection.createAnswer();
await peerConnection.setLocalDescription(answer).catch(err => console.log(err, 'accept-setLocalDescription'));;
socket.emit('message', { 'answer': answer, id })
}
if (data.iceCandidate) {
console.log('iceCandidate')
await peerConnection.addIceCandidate(data.iceCandidate);
}
})
}
</script>
</body>
</html>

提示

本地测试需要使用localhost
线上测试需要是https
如果使用nginx为web服务器可能需要转发代理socket.io

1
2
3
4
5
6
location /socket.io/ {
proxy_pass http://127.0.0.1:3000/socket.io/;
proxy_set_header Upgrade $http_upgrade;
proxy_set_header Connection "upgrade";
proxy_set_header Host $host;
}

有兴趣可以去了解别人封装的webrtc库(webrtc.io)

效果展示

电脑谷歌浏览器
图1
安卓微信内置浏览器(也可以使用火狐,谷歌等浏览器,uc和小米自带不支持)
图2

准备工作

参考文档

公众号(非个人)

个人公众号无法微信认证,无法使用分享接口

  • 1 设置JS接口安全域名
    登录公众号
    在侧边栏找到设置与开发>公众号设置>功能设置>JS接口安全域名
    将验证文件上传至填写域名或路径指向的web服务器
    填写域名,不需要http(s)://,如:www.xxx.com
    阅读全文 »